






Dogfish Head & Hop Butcher For The World Collaborate On Crispy Slice
 Story by:
Bil Corcoran
Story by:
Bil Corcoran
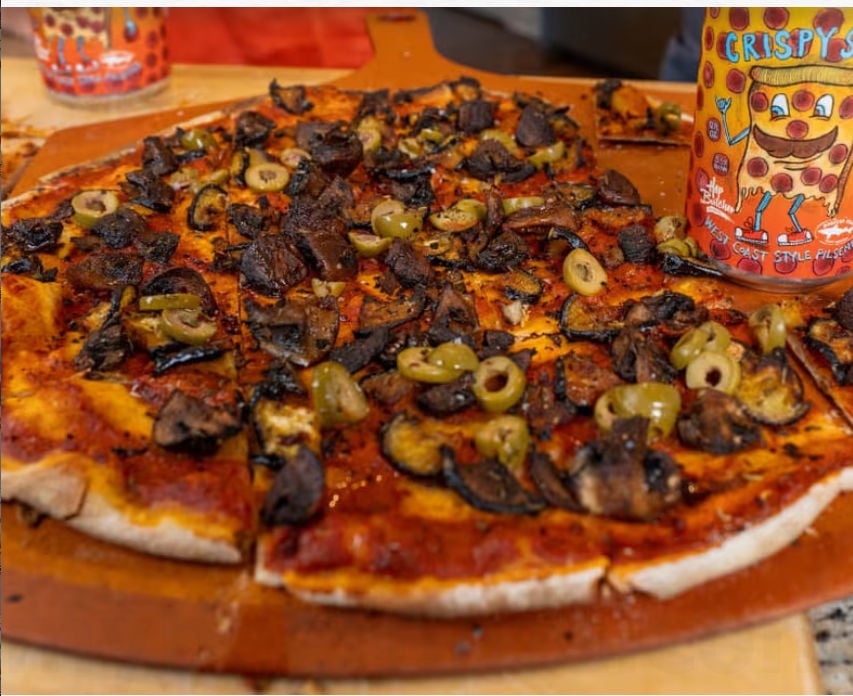
Brewed in collaboration with Hop Butcher For The World, Crispy Slice is a West Coast-style Pilsener made for pizza night. Dogfish Head‘s R&D Brewer, Bryan Selders is in the kitchen cooking up the perfect pizzas to pair with this crushable brew!
Crispy Slice was brewed for those magic moments when pizza grease is on your fingers, a cold lager is in your hand, and another slice feels not just possible, but necessary. Inspired by the crispy, craveable perfection of Chicago tavern-style pizza, this collab is our love letter to the world’s greatest pairing: pizza + beer = forever.
R&D Brewer, Bryan Selders created a recipe for a pizza to pair with this West Coast-style Pilsener, a collab with our pals from Hop Butcher For The World in Chicago. Check out the full recipe below!
Bryan’s Chicago-style Tavern Pizza recipe
This recipe will make enough dough for two outrageously delicious thin crust pizzas. It is important to weigh the ingredients. This not only makes the recipe easier to scale, it also ensures that you can make it the same way every time with consistent results! Mixing instructions are for food processor or stand mixer.
For the dough:
- All-purpose flour – 300 g (Every kitchen scale does metric. Use it. It’s so much easier to math in metric)
- Kosher salt – 6 g
- Active Dry Yeast – 1 g
- Extra Virgin Olive Oil – 30 g
- Water – 150 g
Some equipment you will need:
- Food processor, or
- Stand mixer, or
- Hands for kneading dough
- 2 x 750 ml storage containers with lids
- Rolling Pin
- 2 x 16″ pizza trays or something similar that you already have so you can save some money.
- Parchment paper
- Pizza peel (or a cookie sheet or another pizza tray. Whatever’s clever to get the pie from the counter to the pizza stone. Oh yeah! You’ll also need a …)
- Pizza stone
To mix in a food processor:
- Fit your food processor with the regular blade. Skip the dough blade for this one.
- Add the flour to the food processor bowl.
- On one side of the blade, add the salt.
- On the other side of the blade, add the yeast.
- Add the Extra Virgin Olive Oil wherever you like provided it’s in the bowl.
- Put the lid on the food processor and pulse a few times to combine the ingredients.
- Turn on the food processor and add the water at a rate that allows it to be taken up by the flour.
- Once all of the water is in, continue to process for 25 seconds.
- Turn off the food processor and allow the dough to rest for 15 minutes. If it looks like a rough mass with a bunch of scraggly balls of dough, don’t worry. It’ll all get worked together in about 15 minutes.
- After resting for 15 minutes, turn on the food processor and mix for 20 seconds. In this time the dough will mostly come together in a smooth ball with a couple dough balls trailing behind.
- Turn off the food processor and carefully remove the dough from the bowl. Proceed to the section called “Now that you’ve made the dough:”.
To mix in a stand mixer:
- Add the flour to the stand mixer bowl.
- On one side of the bowl, add the salt.
- On the other side of the bowl, add the yeast.
- Add the Extra Virgin Olive Oil wherever you like. Just make sure it’s in the bowl.
- Give the ingredients in the bowl a quick stir with a spoon, a spatula, a whisk, or even your hand. Just to mix them up a bit.
- Place the bowl on the mixer stand and fit the dough hook onto the mixer.
- Lower the mixer into the bowl, lock it in place, and turn the speed on to low.
- Slowly add the water to the bowl.
- Mix on low until a rough ball forms. If you need to stop the mixer and finish the job by hand, go ahead and do it. Just turn off the machine first.
- Cover the bowl with a clean towel and allow the dough to rest for 15 minutes.
- After 15 minutes, remove the towel, lower the mixer into the bowl and mix on medium low speed for 4 minutes or until a smooth ball forms. It may break into two balls which is fine. It’ll still get worked sufficiently.
- Turn off the mixer and carefully remove the dough from the bowl. Proceed to the section called “Now that you’ve made the dough:”.
To mix by hand:
- In a large bowl, combine the flour, salt, yeast, and olive oil.
- Add the water and mix by hand until a rough ball forms.
- Cover the bowl with a clean towel and let the dough rest for 15 minutes.
- After 15 minutes, place the dough on a lightly floured surface. There’s a bunch of oil in the dough and it’s pretty low hydration so it probably won’t stick to the counter.
- Knead the dough for 10 minutes or until it’s smooth and fairly elastic. It’s a stiff one so just be ready for a workout.
- Proceed to the section called “Now that you’ve made the dough:”.
Now that you’ve made the dough:
- Place the dough on a lightly floured surface and form it into a cohesive ball.
- Using your kitchen scale, weigh the dough then divide that weight by 2. You’ll need this number for the next step.
- Back on the lightly floured surface, cut the dough into two pieces of equal weight.
- Form each piece of dough into nice smooth balls.
- Place each ball in a lightly oiled container, then cover them and put them in the refrigerator.
- Allow the dough to ferment for 3 – 5 days in the refrigerator. 3 days is good, 4 days is better, 5 days is the best.
- After this long cool fermentation, the dough won’t appear to be much bigger. It’ll be softer and smell amazing and that’s just what we want.
- Remove the dough from the fridge.
- Line each of your pizza trays with parchment paper.
- Lightly flour a flat surface big enough to roll out some dough without bumping into stuff on the counter.
- Place one ball in the center of the flour and gently press it so it’s flat on top.
- Lightly flour the top and roll it out to make a 14 inch disk. It’ll be about an eighth of an inch thick, maybe. So like 2 – 3 mm.
- Carefully move the disk from the counter to the parchment lined pizza tray.
- Repeat with the second dough ball.
- Place these trays of dough into the fridge and leave them uncovered for 18-24 hours. The top side will dry out significantly and take on the texture of fruit leather. We’re curing the dough to ensure magical crispness when it’s baked.
It’s time to bake:
- An hour or so before you plan to bake your pizza, position an oven rack with a pizza stone on it in the upper third of your oven. Then pre-heat the oven to 500°F (260°C).
- An hour later, the oven and the stone will be ready for action.
- Remove your disks from the fridge.
- Flip a disk top side down on a pizza peel. You’ll notice that the new top (former bottom) is a bit softer and moister. Just an observation, but the dry side slides real easy on the peel so you don’t need flour or corn meal or anything. Please note that you are not baking on the parchment paper. This only serves to allow you to flip the dough disk over onto a pizza peel so it doesn’t stick the tray that you cured the dough on in the fridge.
- Lay down a layer of sauce all the way to the edges. A third of a cup or so will do it. See below for sauce recipe.
- Add cheese all the way to the edges. You can skip this step if you don’t want all that cheese to get in the way of your pizza enjoyment. Like me. I don’t eat cheese and I’m not ashamed of it.
- Put on whatever other toppings you like.
- Slide the pizza onto the pizza stone and bake for 8 – 10 minutes. Look at it after 8 minutes and give it an extra 2 if needed. You may need to go all the way out to 12 minutes but that’s rare. 10 should do it. You may need to have your oven calibrated.
- Carefully remove the pizza from the oven and place it on a surface that can take the heat and handle the cutting that is about to happen.
- Cut the pizza into squares.
- Crack open another Crispy Slice Pilsner and enjoy some good-ass pizza and beer!
Note: In the event that you don’t have a pizza stone. It’s cool. While you preheat the oven, you can heat up a separate pizza tray or baking sheet and slide a prepared pizza onto it. It’s important that it’s a separate preheated one to ensure that the crust gets crispy. If you are trying to heat up a chunk of metal while trying to bake up a crispy crust, it’ll take a long time and the top of your pizza will be done before the bottom and that would be sad and less delicious.
For the sauce – ingredients:
- Minced Garlic – 22 g
- Red Onion, julienned – 226 g
- Shallots, julienned – 10 g
- Blended Oil – 26 g
- Dried Oregano – 7 g
- Dried Basil – 3 g
- Fresh Thyme – 4 g
- San Marzano Tomato – 2,550 g
- Fennel Seeds – 3 g
- Yields 2 quarts
For the sauce – directions:
- In a skillet over medium heat, sauté onions, shallots and garlic until translucent.
- Once translucent, add herbs and salt, then cook for 2-5 minutes or until fragrant.
- Add tomatoes and simmer for 1 hour.
- Puree with immersion blender until smooth.
- Chill in the fridge until ready for use.
Try Crispy Slice (and other creative libations) at our Weekend of Compelling Ales & Spirits Tasting Tour on April 11!




Comments 0
No Readers' Pick yet.